


Introduction
If you’ve ever wanted a crowd-pleasing appetizer that feels homemade but doesn’t steal your whole day, Sausage Bread is the answer. This is the kind of slice-and-share loaf that disappears from the table while you’re still setting out napkins, because every bite hits that perfect comfort-food trifecta: savory sausage, melty cheese, and warm baked dough with buttery, herby edges. It’s equally at home on a brunch board, next to a bowl of marinara at game day, or tucked into a lunchbox slice-by-slice. Best of all, it’s designed to be simple, reliable, and totally doable even if you don’t consider yourself “a bread person.”
This version leans into real pastry-chef logic, which means we’re not just rolling and hoping for the best. We’re using a few small techniques that make a huge difference, like letting the dough relax so it stretches without snapping back, draining the sausage so the loaf stays crisp instead of greasy, and sealing the edges so the cheese stays where it belongs. You’ll also learn exactly what to look for when it’s done, because the outside can turn golden before the center is fully heated. Once you make it once, it becomes one of those “pocket recipes” you can pull out whenever you need something that feels impressive without being fussy.

There’s a certain magic to foods that look complicated but are secretly easy, and Sausage Bread is one of the best examples. When you slice into a warm loaf and the steam carries that garlic-herb aroma across the kitchen, everyone assumes you spent hours kneading, proofing, and shaping. In reality, this recipe is built for busy home cooks, because it uses ready-to-bake dough and a simple, flavorful filling that does most of the heavy lifting. The outside bakes up golden and crisp, while the inside stays tender and rich from sausage drippings that have been properly controlled, plus cheese that melts into pockets instead of leaking out onto the pan.
Why This Recipe Works
- Prepared pizza dough delivers dependable rise and chew without the long fermentation timeline, so you get bakery-style texture with minimal effort.
- Browning and draining the sausage first keeps the loaf flavorful but prevents soggy layers and greasy pockets, which is the most common reason sausage-filled breads fail.
- A layer of garlic-herb spreadable cheese acts like a flavor “glue,” helping the filling stay cohesive and creamy instead of dry or crumbly.
- Folding and sealing the dough with a clear border builds structure, so the cheese melts inside instead of bubbling out and burning on the pan.
- Brushing with butter and topping with herbs encourages even browning and adds that savory, toasted finish that makes each slice taste complete.
- A brief rest after baking sets the interior, which makes cleaner slices and keeps the cheese from rushing out the moment you cut it.

What Makes This Recipe Special
A lot of sausage bread recipes lean heavily on “dump and roll,” which sounds convenient until you end up with a loaf that splits, leaks, or bakes unevenly. This version is built around a few professional habits that quietly upgrade the outcome, and those habits are exactly what you want for a recipe you’ll rely on for hosting. We’re treating the dough like it deserves respect, letting it warm and relax so it stretches smoothly and doesn’t tear. We’re also building the filling in a way that keeps moisture under control, because sausage and cheese are delicious but they’re also the two ingredients most likely to create a soggy interior if handled carelessly.
Another special point is the “slice-and-share” structure, which makes serving easy and clean. Instead of a messy pull-apart where the filling falls everywhere, you get tidy slices that hold together but still feel indulgent. That matters for brunch boards, showers, and parties where people are balancing plates, drinks, and conversation. It also reheats beautifully, which is rare for stuffed breads, because the fat and cheese help keep the crumb tender rather than drying out. If you’ve ever made a rolled savory bread that turned tough the next day, you’ll appreciate how this one stays pleasantly chewy and satisfying when warmed.

Taste & Texture Results
- The crust bakes up deeply golden with a buttery finish, giving you a slightly crisp bite before you hit the soft interior.
- The inside stays tender and chewy, like a good pizzeria crust, with defined layers rather than a gummy center.
- The filling tastes bold and savory, with sausage flavor supported by garlic-herb notes and a gentle freshness from parsley.
- Cheese melts into creamy pockets and stretchy strands, creating a satisfying pull without making the loaf greasy.
- Each slice holds its shape, so it serves neatly for parties and plates beautifully for brunch spreads.
Ingredients
- 1 pound sweet or hot Italian sausage, casings removed
- 1 pound fresh prepared pizza dough, at room temperature
- 1 container garlic-and-herb spreadable cheese (about 6.5 ounces)
- 2 cups pre-shredded Italian blend cheese
- 2 tablespoons chopped fresh flat-leaf parsley
- 2 tablespoons unsalted butter, melted
- 1 teaspoon dried Italian seasoning
If you need to convert ingredient measurements, adjust baking temperatures, or switch between US and metric units, use our complete baking measurement conversion calculator.

Optional Add-Ins & Substitutions
- Swap Italian sausage for turkey or chicken sausage if you want a lighter loaf, but still brown it well so the flavor stays bold.
- Use breakfast sausage for a brunch-style twist, and pair it with a mild cheese like mozzarella or Monterey Jack for a softer flavor profile.
- Replace the Italian blend with provolone, mozzarella, Swiss, sharp Cheddar, or a mix, keeping the total at about 2 cups for proper melt.
- Add a thin layer of sautéed onions or bell peppers, but cook off moisture thoroughly so the dough stays crisp and the loaf doesn’t steam inside.
- Stir a pinch of crushed red pepper flakes into the sausage if you want heat without switching to hot sausage.
- Swap parsley for basil or chives for a different herb note, especially if you plan to serve it with pesto or marinara.
Baking Science Behind This Recipe
Even though this is a “shortcut” bread, the results still depend on real baking science, and understanding it helps you nail the loaf every time. Pizza dough is essentially a yeast-leavened dough with enough structure to stretch, trap gas, and bake into a chewy crumb. When the dough is cold, the gluten network is tight and elastic, which makes it fight you and snap back during shaping, so letting it come to room temperature is not just convenience—it’s texture control.
Warmed dough stretches more evenly, which reduces thin spots that can tear and leak filling, and it bakes more consistently because the yeast isn’t shocked by a sudden jump into a hot oven. That’s why room-temperature dough is one of the biggest “professional” upgrades you can make for a recipe like this.
The filling is where most stuffed breads go wrong, and it almost always comes down to moisture and fat management. Sausage releases fat as it cooks, and if you trap too much of that fat inside the loaf without draining, it can saturate the dough layers and prevent them from baking through. That can create a heavy, almost steamed interior even if the top looks browned, and it can also cause the seam to split because the filling is too slippery.
Browning the sausage first and draining it on paper towels gives you concentrated flavor with controlled fat, which is exactly what you want. The garlic-herb spreadable cheese acts like a stabilizer, because it coats the dough and helps the shredded cheese melt into a cohesive layer instead of pooling in one spot. When you combine these small choices with proper sealing and resting after baking, you end up with a loaf that slices cleanly and tastes balanced, not greasy.

Step-by-Step Instructions
Preheat your oven to 425 degrees Fahrenheit and line a large baking sheet with parchment paper, because parchment prevents sticking and makes transfer easier when the loaf is hot. Place your skillet over medium-high heat, then add the sausage and start breaking it into small pieces as it cooks so it distributes evenly in the filling. Cook until the sausage is deeply browned and no longer pink, because browning builds savory flavor and reduces excess moisture. When it’s done, move the sausage to a paper towel–lined plate so the extra fat drains away, which keeps the bread from turning soggy. Visually, you want small crumbles that look browned on the edges, not pale or wet.

Set the sausage aside to cool slightly while you shape the dough, because very hot filling can soften the dough too quickly and make it harder to seal cleanly. Place a large sheet of parchment on your counter and lightly dust your hands, not the dough, if it feels sticky, because too much flour can prevent a good seal. Roll or gently stretch the pizza dough into a rectangle about 13 by 9 inches, aiming for even thickness so it bakes at the same speed across the loaf.
If the dough keeps springing back, let it rest for 10 to 15 minutes, because gluten relaxes with time and then stretches without tearing. The visual cue you want is a rectangle that holds its shape without shrinking as soon as you let go.

Spread the garlic-and-herb cheese evenly over the dough, leaving a border of about 1/2 inch all around, because that clean edge is what allows you to seal the loaf without filling escaping. Sprinkle the cooked sausage evenly over the cheese layer, distributing it so every slice gets the same amount of filling. Add the shredded cheese in an even blanket, then scatter the chopped parsley over the top for freshness and color.
The reason for layering this way is that the spreadable cheese creates a creamy base, the sausage gives structure and flavor, and the shredded cheese melts into pockets that hold the filling together. Visually, the filling should look evenly scattered with no heavy mound in the center, because a thick center can cause splitting.

Starting on one long side, fold the dough over so the long edges meet, then press the edges together firmly to seal, because a strong seal keeps the cheese inside where it belongs. Pinch and crimp along the seam and the ends, and don’t rush this step, because most leaks happen when the seam is only lightly pressed. Transfer the filled loaf to the parchment-lined baking sheet with the seam side down, because seam-side down uses the pan’s support to keep the loaf closed during oven spring. Brush the top with melted butter to encourage even browning and add rich flavor, then sprinkle the dried Italian seasoning evenly for a classic, aromatic finish.
The visual cue here is a smooth, sealed loaf with a glossy butter sheen on top and herbs lightly speckled across the surface.

Bake for about 30 minutes, watching for deep golden color and a firm crust, because color is an important doneness signal for enriched, filled doughs. After about 20 minutes, loosely tent the loaf with foil if it’s browning too quickly, because the top can brown before the interior is fully hot. You want the loaf to look golden and feel set when gently pressed, not soft or squishy, which can indicate underbaked dough beneath the crust.
When it’s done, let it rest on the pan for 10 minutes, because resting allows the cheese to thicken slightly and keeps the slices tidy. Visually, the loaf should look evenly browned, and when you slice, the filling should stay in place rather than sliding out.

Baking Tools & Equipment
- Large skillet
- Wooden spoon or sturdy spatula
- Paper towels and a plate for draining
- Parchment paper
- Large rimmed baking sheet
- Pastry brush for butter
- Bread knife or serrated knife
- Cutting board
“Each baking tool listed above was carefully selected for consistent results. Click any product name to explore trusted kitchen essentials.”

How To Know When Baking Is Done
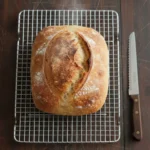
The most reliable doneness cues combine color, structure, and internal heat, because filled breads can fool you by browning fast on the outside. You’re looking for a top crust that’s evenly golden brown with darker toasted spots around the edges, which tells you the surface sugars and fats have developed flavor.
When you gently press the top with your fingertips, it should feel firm and spring back slightly, not sink or feel doughy.
If you lift the loaf carefully with a spatula, the bottom should look browned and dry, not pale or damp, because a pale bottom often means the interior is still underbaked.
If you prefer a more precise check, you can insert an instant-read thermometer into the center of the loaf, aiming for a hot center that reads around 190 to 200 degrees Fahrenheit, which indicates the dough is baked through and the filling is thoroughly heated. The final visual sign is slicing: after resting, the cheese should look melted and creamy, not watery, and the dough should show a baked crumb rather than a raw, gummy line near the seam.
Common Mistakes To Avoid
- Skipping the sausage draining step, which can turn the interior greasy and soften the dough layers until they bake up gummy.
- Stretching cold dough aggressively, because it tears easily and creates thin spots that leak filling during baking.
- Overfilling the center, which makes sealing difficult and increases the chance of splitting when the dough expands in the oven.
- Forgetting the border around the dough, because a filling-covered edge won’t seal properly and cheese will escape and burn.
- Cutting immediately after baking, because the cheese will be too loose and will flood out instead of staying in clean layers.
- Baking without tenting when needed, because the top can brown too dark while the center is still warming through.

Storage & Freezing Guide
- Store cooled leftovers in an airtight container in the refrigerator for up to 3 days, because the filling is perishable and needs chilling.
- Reheat slices in a 350 degree Fahrenheit oven, loosely covered with foil, until warmed through, because gentle heat keeps the crust from over-browning.
- For quick reheating, use a toaster oven so the crust stays crisp, and avoid overheating in the microwave if you want the best texture.
- Freeze whole or sliced bread for up to 2 months, wrapping tightly in plastic wrap and then foil, because double-wrapping prevents freezer burn.
- Thaw overnight in the refrigerator before reheating, because slow thawing keeps the dough from turning tough or drying out.
- If freezing slices, place parchment between pieces so you can grab exactly what you need without breaking them apart.
Flavor Variations
- Turn it into a pizza-style loaf by adding pepperoni and using mozzarella, then serve with warmed marinara for dipping.
- Make a breakfast version with breakfast sausage, a mild cheese blend, and a sprinkle of chives for a brunch-board upgrade.
- Go extra herby by mixing chopped basil into the parsley and finishing with grated Parmesan after baking for a salty, aromatic crust.
- Add sautéed mushrooms that have been cooked until dry, because mushrooms hold water and need moisture removed to keep the loaf crisp.
- Use spicy Italian sausage and add crushed red pepper flakes for a heat-forward version that pairs well with ranch or marinara.
- Make it “garlic bread” style by adding a little minced garlic to the butter before brushing, then topping with extra Italian seasoning.
Frequently Asked Questions
1. Can I make this Sausage Bread ahead of time and bake it later?
Yes, you can assemble the loaf ahead, and it’s one of the best ways to make hosting feel calm. Prepare the loaf through sealing and placing it on the baking sheet, but hold off on brushing with butter and sprinkling the seasoning until you’re ready to bake, because butter can soften the surface during refrigeration. Wrap the assembled loaf tightly and refrigerate for up to 24 hours, then let it sit at room temperature briefly while the oven preheats so the dough isn’t ice-cold going in.
You may need to add a few extra minutes to the bake time, because chilled filling takes longer to heat through than fresh. The visual cue for success is the same: golden crust, firm feel, and a hot center when sliced after resting.
2. What’s the best cheese for cheesy sausage bread if I don’t have Italian blend?
Italian blend is convenient, but you have plenty of great options depending on the melt and flavor you want. Mozzarella gives you that classic stretchy pull and mild flavor, while provolone adds a slightly sharper bite that tastes very deli-style. Swiss can be delicious if you want a nutty tone, especially with mild sausage, and sharp Cheddar brings boldness that stands up to spicy sausage.
The key is keeping the amount around 2 cups, because too much cheese can increase leakage and make sealing harder. For the most balanced result, use a mix of a good melter like mozzarella plus a flavorful cheese like provolone or Cheddar.
3. Why did my sausage bread split open while baking?
Splitting usually happens for one of three reasons, and the good news is they’re all easy to fix next time. The most common cause is an incomplete seal, especially at the ends, because dough expands in the oven and will push filling toward any weak spot. Another cause is overfilling, which creates pressure and makes it hard for the dough to stretch without tearing. Finally, thin spots in the dough from uneven rolling can create a “break point” where the loaf opens as it rises. Next time, focus on even thickness, keep a clear border, and pinch firmly along the seam, then bake seam-side down so the pan supports the closure.
4. What should I serve with this sausage bread for a party or brunch?
This loaf is rich and savory, so the best pairings add freshness, acidity, or a light contrast in texture. For parties, a warm marinara sauce is a classic dip, and pesto is great if you want a more herb-forward option. For brunch, pair slices with scrambled eggs and a fruit salad, because bright fruit balances the salt and cheese beautifully. If you’re serving it as lunch, a crisp green salad with a tangy vinaigrette keeps the plate from feeling heavy. You can also add a simple vegetable tray, because crunchy veggies give guests a refreshing break between bites of warm bread. The beauty is that the loaf stands on its own, so sides are about balance, not necessity.

Expert Baker Tips
- Let the dough come fully to room temperature so it stretches evenly and seals without fighting you.
- Brown the sausage deeply and drain well, because that’s where big flavor comes from without turning the loaf greasy.
- Keep the filling evenly distributed with no heavy center mound, which helps the loaf bake evenly and prevents splitting.
- Seal firmly and place seam-side down so the loaf stays closed during oven spring.
- Tent with foil if browning too fast, because color develops before the center is fully heated.
- Rest before slicing so the cheese sets slightly and the loaf cuts cleanly for serving.
Related Recipes From Our Kitchen
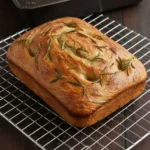
- Focaccia Bread Recipe — A chewy, olive-oil-rich pan bread with an airy crumb and crisp edges, perfect for dipping, sandwiches, or serving alongside soups.

Final Baking Notes
If you want one dependable recipe that makes you feel like the most prepared host in the room, Sausage Bread belongs in your rotation. It’s cozy and satisfying without being complicated, and it delivers that “everyone asks for the recipe” reaction with ingredients you can grab at almost any U.S. grocery store. The technique is simple, but the little details—draining the sausage, relaxing the dough, sealing well, and resting before slicing—are what make the loaf bake up clean, golden, and sliceable every time.
Once you’ve made it once, you’ll start imagining variations for different seasons and gatherings, because the method is sturdy and forgiving. Bake it for brunch, game day, showers, potlucks, or just because you want a warm, savory slice that tastes like comfort. And when you pull it from the oven and watch those first slices disappear, you’ll understand why this is the kind of recipe people remember.

Sausage Bread Recipe
Ingredients
Equipment
Method
- Preheat the oven to 425 degrees Fahrenheit and line a large baking sheet with parchment paper.
- Cook the sausage in a skillet over medium-high heat, breaking it into small pieces, until browned and no longer pink, about 6 to 8 minutes; transfer to a paper towel–lined plate to drain.
- Place pizza dough on parchment and roll or stretch into a 13 by 9 inch rectangle; if the dough springs back, let it rest at room temperature for 10 to 15 minutes, then continue shaping.
- Spread the garlic-and-herb spreadable cheese over the dough, leaving a 1/2 inch border around the edges.
- Top evenly with the cooked sausage, shredded Italian blend cheese, and chopped parsley.
- Starting on one long side, fold the dough over so the long edges meet; pinch and crimp edges and ends firmly to seal.
- Transfer to the prepared baking sheet seam-side down. Brush the top with melted butter and sprinkle with dried Italian seasoning.
- Bake until golden brown, about 30 minutes; loosely tent with foil after about 20 minutes if the top is browning too quickly.
- Rest on the pan for 10 minutes, then transfer to a cutting board, slice with a serrated knife, and serve.
Notes
- Use pizza dough at room temperature so it stretches evenly and seals without tearing.
- If the dough keeps snapping back, let it rest 10 to 15 minutes to relax before shaping.
- Brown the sausage well and drain it on paper towels to prevent a greasy, soggy interior.
- Keep the filling evenly spread and avoid piling it in the center to reduce splitting during baking.
- Always leave a 1/2 inch border so the seam seals securely and cheese stays inside.
- Place the loaf seam-side down so the pan supports the closure during oven spring.
- Brush with melted butter for even browning and a richer, more aromatic crust.
- Tent with foil after about 20 minutes if the top darkens too quickly so the center can heat through.
- Rest 10 minutes before slicing so the cheese sets slightly and slices stay neat.
- Reheat leftovers at 350 degrees Fahrenheit, loosely covered with foil, until hot throughout for the best texture.
- Refrigerate leftovers airtight for up to 3 days due to the perishable filling.
- Freeze whole or sliced bread up to 2 months, tightly wrapped; thaw overnight in the refrigerator before reheating.


