

Introduction
A great brownie recipe should give you everything you want in one bite: deep chocolate flavor, a moist center, a delicate crackly top, and those irresistible edges that turn slightly chewy in the pan. This brownie recipe is built for exactly that. It is rich without being heavy, simple without feeling basic, and reliable enough for both beginner bakers and experienced home cooks who want a homemade dessert that always delivers.
These brownies come together with pantry staples, which is one of the reasons this brownie recipe becomes a repeat favorite in so many kitchens. You do not need fancy chocolate bars, complicated methods, or extra bowls. The batter is straightforward, the texture is flexible depending on bake time, and the final result tastes far better than a boxed mix. Whether you want brownies for a family dessert, a bake sale, a party tray, or a late-night chocolate craving, this recipe gives you a pan of brownies that feel truly worth making from scratch.

Another reason this brownie recipe stands out is how adaptable it is. You can bake the brownies a little less for a gooier center or a little longer for a firmer, chewier bite. You can keep them classic or add chopped nuts, espresso powder, chocolate chunks, or a swirl on top. Even in its most basic form, though, this brownie recipe produces brownies with the kind of texture and flavor people remember.
Why You Will Love This Recipe
- This brownie recipe uses simple pantry ingredients you likely already have at home.
- The brownies have a rich chocolate flavor with a shiny crackly top.
- You only need one bowl for the batter, which keeps cleanup easy.
- The texture is deeply fudgy, but you can adjust the bake time for a chewier result.
- These brownies taste homemade in the best way, with more flavor than a boxed mix.
- The recipe is beginner-friendly and still satisfying for experienced bakers.
- You can customize the brownies with nuts, chocolate chunks, or other mix-ins.
- The brownies slice cleanly after cooling and store well for several days.
- This brownie recipe works for casual baking, parties, holidays, and gifting.
- The method is straightforward, so you can make brownies with confidence every time.
What Makes This Recipe Special
Not every brownie recipe balances ease, texture, and flavor equally well. Some brownies are too cakey, some are overly sweet, and some rely on extra steps that do not actually improve the final pan. What makes this brownie recipe special is that it focuses on the details that matter most and removes the ones that do not.
First, the chocolate flavor is driven by cocoa powder and chocolate chips, which creates brownies that taste intense and satisfying without becoming too sugary. Cocoa gives the brownies a concentrated chocolate base, while the chocolate chips add pockets of melted richness throughout the pan. That combination creates depth and gives the brownies a more luxurious texture.
Second, this brownie recipe uses a mixing method that helps create the signature shiny top many bakers love. Whisking the warm butter, sugar, and cocoa together begins dissolving some of the sugar, which helps form that delicate crust as the brownies bake. It is a small step, but it makes a visible difference.
Third, the structure of the brownies is carefully balanced. There is enough flour to hold the brownies together, but not so much that the crumb turns dry or cakey. The eggs add richness and help the brownies lift slightly while still staying dense and moist. The result is a brownie recipe that feels indulgent, polished, and bakery-worthy without being difficult.
Finally, this brownie recipe is special because it respects different preferences. Some people want brownies that are gooey in the center. Others want brownies that are slightly firmer and chewier. This recipe lets you control that final texture with bake time, which means one brownie recipe can satisfy more than one kind of brownie lover.

Taste and Texture
The flavor of these brownies is deeply chocolate-forward from the very first bite. They taste rich and decadent, but not cloying. The cocoa gives them a dark, concentrated chocolate backbone, while vanilla rounds out the flavor and makes the brownies taste fuller and more balanced. The chocolate chips melt into the batter as the brownies bake, adding bursts of smooth chocolate throughout.
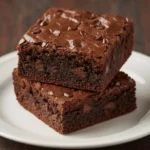
Texture is where this brownie recipe really shines. When baked on the shorter end, the brownies have a fudgy center that feels dense, soft, and almost truffle-like without crossing into underbaked. The edges become slightly firmer and chewier, which gives each square a satisfying contrast. The top develops a thin, delicate crust that flakes lightly when cut, adding that classic brownie finish.
If you bake the brownies a little longer, the center becomes more set and the texture shifts from gooey to chewy. The brownies still stay moist, but they become easier to slice very neatly and hold up especially well for serving on dessert platters or packing into lunch boxes. Either way, this brownie recipe gives you brownies with a strong chocolate identity, a moist crumb, and a texture that feels intentionally crafted.
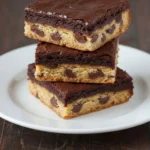
A close-up texture shot is especially useful here because it shows the glossy top and the dense interior. Alt text ideas include “fudgy brownie recipe sliced to show moist center” and “homemade brownie recipe with shiny top and chewy edges.”

Ingredients
- 1 cup unsalted butter
Butter gives this brownie recipe richness, flavor, and a smooth, moist crumb. - 2 cups granulated sugar
Sugar sweetens the brownies and helps create the signature crackly top. - 3/4 cup unsweetened cocoa powder
Cocoa powder brings bold chocolate flavor to the brownies without making the batter overly complicated. - 3 large eggs, room temperature
Eggs provide structure, moisture, and a little lift while keeping the brownies rich. - 1 tablespoon pure vanilla extract
Vanilla deepens the chocolate flavor and rounds out the sweetness. - 1 teaspoon salt
Salt balances the sweetness and sharpens the chocolate notes in the brownies. - 1 cup all-purpose flour
Flour gives the brownies enough structure to hold together while staying fudgy. - 1 1/2 cups semisweet chocolate chips
Chocolate chips melt into the brownies and add extra richness and texture.
If you need to convert ingredient measurements, adjust baking temperatures, or switch between US and metric units, use our complete baking measurement conversion calculator.

Optional Add-Ins and Substitutions
- Chopped walnuts or pecans for added crunch and a classic brownie texture contrast
- Bittersweet chocolate chunks for a deeper, less sweet chocolate flavor
- Milk chocolate chips if you prefer sweeter brownies
- Dark chocolate chips for a more intense finish
- Espresso powder to deepen the chocolate flavor without making the brownies taste like coffee
- Browned butter for a nuttier, more complex flavor
- A mix of granulated sugar and light brown sugar for a subtle caramel note
- White chocolate chips for sweet contrast against the dark cocoa base
- Crushed sandwich cookies for a fun mix-in with texture
- A pinch of cinnamon for warmth and depth
- Vegetable oil in place of butter if you want a texture closer to classic box-mix brownies, though butter gives better flavor
- Dutch-process cocoa powder if you want a darker, smoother chocolate profile

Baking Science Behind This Recipe
A strong brownie recipe works because each ingredient has a specific job. Once you understand those roles, it becomes much easier to make consistent brownies and even adjust them to your taste.
Butter provides richness and moisture, but it also affects texture. Because butter contains both fat and a small amount of water, it helps brownies stay tender while still baking into a structured bar. Using butter instead of oil gives the brownies better flavor and a slightly firmer bite around the edges.
Sugar does more than sweeten the brownies. It contributes to the shiny top, helps keep the texture soft, and supports moisture retention. When sugar is whisked with warm butter, some of it begins to dissolve, which helps create that glossy crust on top of the brownies during baking.
Cocoa powder is the main chocolate foundation in this brownie recipe. Because cocoa has concentrated flavor without added sugar or extra fat, it gives the brownies a strong chocolate taste and keeps the batter simple. Chocolate chips then layer in melted richness and add more texture.
Eggs are essential in brownies because they bind the batter and help it set. They also add richness. More mixing after the eggs go in can increase the glossy finish on top, but once the flour is added, you want to mix gently so the brownies stay tender.
Flour is one of the most important ingredients to measure correctly. Too little, and the brownies can fall apart. Too much, and the brownies become dry or cakey. This brownie recipe uses just enough flour to support the dense texture while keeping the interior moist and fudgy.
Bake time also changes brownie science in a very noticeable way. A shorter bake leaves more moisture in the center, which produces fudgier brownies. A longer bake evaporates more moisture and sets the crumb more fully, resulting in brownies that are chewier and slightly more cake-like. That is why checking visual cues matters more than relying on the clock alone.
How to Make It
Preheat the oven and prepare the pan.
Heat your oven to 350 degrees Fahrenheit. Lightly grease an 8-inch square metal baking pan and line it with parchment paper, leaving enough overhang to lift the brownies out later. This matters because brownies can stick easily, and parchment makes removal and clean slicing much easier. The pan should look fully lined with the parchment pressed neatly into the corners.

Melt the butter gently.
Place the butter in a large microwave-safe bowl and melt it in short intervals, stirring between each one until fully melted. This matters because butter can splatter or overheat quickly if left unattended. You are looking for fully melted butter that is smooth and warm, not bubbling aggressively or browned unless you are intentionally using browned butter.

Whisk in the sugar and cocoa powder.
Add the granulated sugar and cocoa powder to the warm butter and whisk vigorously for about 30 seconds. This step matters because it starts dissolving the sugar and helps build that shiny crackly top that makes brownies so appealing. The mixture will look thick, dark, and slightly glossy when ready.

Add the eggs, vanilla, and salt.
Crack in the eggs, then add the vanilla and salt. Whisk until the mixture is fully combined and smooth. This matters because the eggs create structure and richness, while the vanilla and salt round out the chocolate flavor. The batter should look thicker, silkier, and more cohesive after this step.

Fold in the flour.
Add the flour to the bowl and switch to a spatula to fold it in gently. This matters because overmixing once flour is added can develop gluten and make the brownies tougher than you want. Stop mixing when the flour streaks are almost gone and the batter looks thick and uniform.

Stir in the chocolate chips.
Fold the chocolate chips into the batter until they are evenly distributed. This matters because you want melted chocolate throughout the brownies rather than a few concentrated pockets. The batter should now look very thick, glossy, and studded with chocolate.

Spread the batter into the prepared pan.
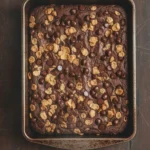
Transfer the batter to the lined pan and spread it into an even layer, smoothing the top with your spatula. This matters because an even layer helps the brownies bake at the same rate across the pan. The surface should look level and dense, with chocolate chips visible here and there.

Bake until the brownies reach your preferred texture.
Bake for about 35 to 40 minutes for fudgy brownies or longer if you want a firmer, chewier texture. This matters because bake time is one of the easiest ways to customize the final result. For fudgy brownies, the top should be set and shiny, and a toothpick inserted in the center should come out with moist crumbs or a light smear. For a more set brownie, the toothpick should come out with just a few crumbs.

Cool completely before slicing.
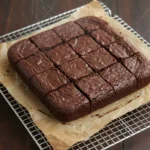
Let the brownies cool fully in the pan before lifting them out and cutting. This matters because hot brownies are fragile and can fall apart if sliced too soon. Once cooled, the brownies should feel set, the edges should release cleanly, and the cuts will look much neater.
Baking Tools and Equipment
- 8-inch square metal baking pan
- Parchment paper
- Large microwave-safe mixing bowl
- Whisk
- Rubber or silicone spatula
- Measuring cups and spoons
- Cooling rack
- Sharp knife for slicing
- Kitchen scale, if available, for the most accurate flour measurement
Each baking tool listed above was carefully selected for consistent results. Click any product name to explore trusted kitchen essentials.
How to Know It Is Done
Knowing when brownies are done can be tricky because brownies continue to set as they cool. Pulling them at the right moment is what separates rich, fudgy brownies from dry ones.
Start by looking at the top. The surface should appear set rather than wet, and you should see a slight sheen or crackly finish across the center. The edges should look slightly firmer and may begin pulling away from the pan just a little.
Next, test the center with a toothpick. For fudgy brownies, you want the toothpick to come out with moist crumbs or a thin smear of batter. It should not come out completely liquid, but it also should not be fully clean if you want that dense center. For chewier, more set brownies, the toothpick should come out with only a few soft crumbs attached.
You can also gently shake the pan. If the very center still ripples like loose batter, the brownies need more time. If the center looks set and only moves slightly as one solid piece, the brownies are ready to come out.
Remember that carryover heat matters. This brownie recipe finishes setting as it cools, so it is better to pull the brownies a little early than to overbake them.
Common Mistakes to Avoid
- Using too much flour because packed flour can make brownies dry and heavy
- Overmixing after adding flour which can make brownies tougher instead of tender
- Skipping the parchment paper and ending up with brownies that stick to the pan
- Using a glass or ceramic pan without adjusting time which can affect how evenly the brownies bake
- Overbaking the brownies and losing that rich fudgy center
- Cutting the brownies while still hot which leads to messy slices and a fragile texture
- Using low-quality cocoa powder when chocolate flavor is the star of the recipe
- Not whisking the butter, sugar, and cocoa enough which can reduce the shiny crackly top
- Ignoring room temperature eggs because cold eggs can make the batter less smooth
- Adding too many mix-ins which can overwhelm the batter and affect structure
Storage and Freezing
- Store brownies in an airtight container at room temperature for up to 4 days.
- Place parchment between layers if stacking brownies to prevent sticking.
- For a slightly firmer texture, store brownies in the refrigerator, though this can make them feel denser.
- To freeze, wrap individual brownie squares tightly in plastic wrap and place them in a freezer-safe container or bag.
- Freeze brownies for up to 3 months for the best flavor and texture.
- Thaw brownies at room temperature before serving.
- For a warm dessert feel, microwave a brownie for a few seconds before serving.
- If freezing a whole slab, cool completely first, then wrap well before freezing.

Flavor Variations
- Walnut brownies for a classic bakery-style crunch
- Espresso brownies with a small amount of espresso powder to intensify the chocolate
- Dark chocolate brownies using bittersweet chips and Dutch-process cocoa
- Cookies and cream brownies with chopped sandwich cookies folded into the batter
- Salted brownies finished with a light sprinkle of flaky sea salt after baking
- Peppermint brownies with peppermint pieces or a drop of peppermint extract during the holidays
- Caramel brownies with a light caramel swirl for a richer dessert
- Peanut butter brownies with spoonfuls of peanut butter swirled through the batter
- Mocha brownies combining vanilla and coffee notes for a deeper flavor
- Double chocolate brownies by adding extra chocolate chunks on top before baking
Expert Tips
- Measure flour carefully with a spoon-and-level method or a kitchen scale.
- Use a metal pan for the most even baking and the best edge texture.
- Let the butter stay warm when adding sugar and cocoa so the mixture blends more effectively.
- Do not rush the whisking step if you want that classic crackly brownie top.
- Fold the flour in gently and stop once the batter is combined.
- For cleaner slices, chill the cooled brownies briefly before cutting.
- Wipe your knife between cuts for neat brownie squares.
- Use high-quality cocoa powder and chocolate chips because the flavor difference is noticeable.
- Bake toward the lower end of the time range if you love gooey brownies.
- Let the brownies cool fully so the crumb can set and the texture becomes richer and more defined.
Frequently Asked Questions
1. Why did my brownies turn out dry?
Dry brownies usually come from too much flour or too much bake time. In a brownie recipe like this one, small measuring differences matter, especially with flour. Use the spoon-and-level method or weigh your flour for the best accuracy. Also remember that brownies continue to set as they cool, so pulling them from the oven when they still have moist crumbs on the toothpick helps keep them fudgy.
2. How do I get a shiny crackly top on my brownies?
A shiny top often comes from properly whisking the warm butter, sugar, and cocoa together so some of the sugar begins dissolving. That dissolved sugar helps create the crackly surface as the brownies bake. Be sure not to skip this step, and whisk with some energy rather than stirring lazily. This brownie recipe is designed to support that classic glossy finish.
3. Can I make this brownie recipe without chocolate chips?
Yes, you can make the brownies without chocolate chips if needed. The cocoa powder already provides the main chocolate flavor, so the brownies will still taste rich and satisfying. That said, the chocolate chips add pockets of melted chocolate and extra decadence, so the final texture will be a little less luxurious without them.
4. Should brownies be gooey in the middle?
That depends on the style of brownies you like. Many people prefer brownies with a fudgy, slightly gooey center because it makes them feel richer and more indulgent. Others prefer brownies that are more set and chewy. One of the strengths of this brownie recipe is that you can adjust the bake time to get closer to your preferred texture.
5. Can I use a different pan size for this brownie recipe?
Yes, but changing the pan size changes both the thickness and the bake time. A larger pan will produce thinner brownies that bake faster, while a smaller pan creates thicker brownies that may need longer in the oven. For the best results and the texture described in this post, an 8-inch square pan is ideal.
6. How long should I let brownies cool before cutting?
You should let the brownies cool completely before slicing if you want clean edges and the best final texture. While it can be tempting to cut into warm brownies, the interior is still setting during that cooling period. Waiting helps the brownies hold together better and makes the slices look much more polished.
Final Notes
A dependable brownie recipe is one of the most valuable desserts to keep in your baking rotation, and this one earns that place easily. These brownies are rich, deeply chocolatey, simple to mix, and flexible enough to satisfy different texture preferences with just a small adjustment in bake time. Whether you serve them plain, dress them up with a scoop of ice cream, or pack them for sharing, they have the kind of classic homemade appeal that never goes out of style. Once you learn the visual cues and trust the method, this brownie recipe becomes the kind of recipe you return to again and again because it delivers exactly what great brownies should: flavor, texture, and true baking confidence.

Brownie Recipe
Ingredients
Equipment
Method
- Preheat the oven to 350 degrees Fahrenheit. Lightly grease an 8-inch square metal baking pan and line it with parchment paper.
- Melt the butter in a large microwave-safe bowl in short intervals, stirring between each one until fully melted.
- Add the granulated sugar and cocoa powder to the warm butter and whisk vigorously for about 30 seconds.
- Add the eggs, vanilla, and salt, then whisk until fully combined and smooth.
- Add the flour and fold it in gently with a spatula until the flour streaks are almost gone.
- Fold in the chocolate chips until evenly distributed.
- Spread the batter evenly into the prepared pan.
- Bake for 35 to 40 minutes for fudgy brownies, or longer for a firmer, chewier texture, until the top is set and shiny and a toothpick comes out with moist crumbs or a light smear.
- Let the brownies cool completely in the pan before lifting out and slicing.
Notes
- Use a metal pan for the most even baking and the best chewy brownie edges.
- Measure the flour carefully to avoid dry, cakey brownies.
- Whisking the warm butter, sugar, and cocoa well helps create the shiny crackly top.
- Room temperature eggs blend more smoothly into the batter.
- Do not overmix after adding the flour or the brownies can become tougher.
- Bake closer to 35 minutes for a gooier, more fudgy center.
- Bake longer if you want brownies that are more set and chewy.
- A toothpick with moist crumbs is the best sign for fudgy brownies.
- Let the brownies cool completely before slicing for the cleanest cuts.
- Wipe the knife between cuts for neater brownie squares.
- High-quality cocoa powder and chocolate chips will improve the overall flavor.
- Store brownies in an airtight container at room temperature for up to 4 days.
- Place parchment between layers if stacking brownies for storage.
- Wrap individual brownies well before freezing for up to 3 months.
- Thaw frozen brownies at room temperature before serving.
- Calories: 349
- Carbohydrates: 42 g
- Protein: 4 g
- Fat: 20 g
- Saturated Fat: 12 g
- Sugar: 31 g
- Fiber: 3 g
- Sodium: 163 mg
- Cholesterol: 66 mg


 Recipe")
 Recipe")