

Introduction
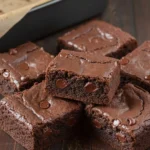
If you are looking for a brownies recipe that delivers deep chocolate flavor, a dense fudgy center, and that glossy crackly top that makes homemade brownies so irresistible, this is the one to bake. These brownies are rich without being overwhelming, thick without turning cakey, and balanced enough to make you reach for a second square before the first one is gone. They are the kind of brownies that feel bakery-worthy, yet they are absolutely achievable in a home kitchen.
What makes this brownies recipe especially appealing is how it builds chocolate flavor in layers. Cocoa powder gives the batter depth, melted chocolate adds body and richness, and chocolate chips create pockets of melted chocolate throughout. The result is a pan of homemade brownies that slices cleanly when cool, tastes luxuriously fudgy, and satisfies both edge lovers and center-piece fans.

This is also a very practical recipe. It uses familiar ingredients, a straightforward mixing method, and one important technique that makes a real difference: beating the eggs and sugar until thick and pale. That one step helps create the shiny top and contributes to the texture that makes these brownies stand out. Whether you are baking for a family dessert, a party tray, a lunchbox treat, or a weekend chocolate craving, these brownies are worth keeping in permanent rotation.
Why You Will Love This Recipe
- These brownies are deeply chocolatey with a rich, almost truffle-like interior.
- The texture is dense and fudgy instead of cakey.
- You get a shiny crackly top that looks as good as it tastes.
- The ingredient list is simple and built from classic baking staples.
- The batter comes together without complicated steps or specialty techniques.
- This brownies recipe works beautifully for both casual baking and special occasions.
- The squares store well, travel well, and freeze well.
- You can keep them classic or customize them with add-ins.
- They taste even better once fully cooled, which makes them ideal for make-ahead baking.
- They feel indulgent and impressive, but the method is approachable for beginners.

What Makes This Recipe Special
There are plenty of brownie recipes out there, but not all brownies are aiming for the same result. Some are chewy, some are cakey, and some lean almost like chocolate cake bars. This version is designed for people who want truly fudgy homemade brownies with a concentrated chocolate flavor and a soft, dense bite.
The first thing that makes this recipe special is the chocolate balance. Instead of relying on only cocoa powder or only melted chocolate, this recipe uses both. Cocoa powder gives you a bold chocolate foundation, while melted baking chocolate adds richness and smoothness. Then chocolate chips and chopped chocolate folded into the batter create extra body and little bursts of molten chocolate after baking.
The second standout feature is the egg and sugar mixing method. Beating the eggs and sugar until pale and ribbon-like is not just a visual step. It helps dissolve the sugar more effectively, which improves the finished texture and supports that glossy brownie top. It is a small detail with a big payoff.
Finally, this brownies recipe is baked in a 9-inch square metal pan, which gives the brownies more thickness and a more luxurious center. A thinner brownie can still taste good, but a thicker brownie lets the fudgy texture really shine. If you want brownies that feel substantial, rich, and satisfying, this recipe is built exactly for that experience.
Taste and Texture
These brownies have a strong, unmistakable chocolate flavor that tastes dark, rich, and rounded rather than flat or overly sweet. The cocoa powder gives them intensity, while the melted chocolate adds smoothness and depth. Vanilla softens the edges of all that chocolate and helps make the flavor feel fuller and more complete.
The texture is where these brownies really earn their place. The center is moist, dense, and velvety, almost like soft chocolate fudge with just enough crumb to make it unmistakably brownie rather than candy. The edges are slightly firmer and more structured, giving you a pleasant contrast between the chewy outer portion and the softer interior.
The top bakes into that signature shiny crackly layer that many bakers chase and few achieve consistently. Underneath it, the crumb stays tight and plush, not airy or cake-like. When you bite in, you get a soft resistance, then a melt-in-your-mouth finish with chocolate lingering on the palate. These are not casual, forgettable brownies. They are the kind that make people ask for the recipe.

Ingredients
- 3/4 cup unsalted butter, cut into pieces
Butter gives these brownies rich flavor and helps create a smooth, luxurious texture. - 4 ounces semi-sweet or bittersweet chocolate, chopped and divided
Half is melted into the batter and half is folded in later for extra chocolate pockets. - 1 and 2/3 cups granulated sugar
Sugar sweetens, helps create the glossy surface, and contributes to the soft center. - 3 large eggs, at room temperature
Eggs provide structure, richness, and the lift needed for a proper brownie texture without making the brownies cakey. - 2 teaspoons pure vanilla extract
Vanilla rounds out the chocolate flavor and makes the brownies taste more complete. - 1 cup unsweetened cocoa powder
Dutch-process cocoa powder is especially good here for a smoother, darker chocolate flavor, though natural cocoa powder can also work. - 1 cup all-purpose flour
Flour gives the brownies structure while still allowing the texture to stay dense and fudgy. - 3/4 teaspoon salt
Salt sharpens the chocolate flavor and balances sweetness. - 1 cup semi-sweet chocolate chips
Chocolate chips help create extra richness and support the shiny brownie crust.
If you need to convert ingredient measurements, adjust baking temperatures, or switch between US and metric units, use our complete baking measurement conversion calculator.

Optional Add-Ins and Substitutions
- Chopped walnuts or pecans: Add 3/4 cup for crunch and a classic brownie feel.
- Espresso powder: Add 1 teaspoon to deepen the chocolate flavor without making the brownies taste like coffee.
- Bittersweet chocolate chips: Use these instead of semi-sweet if you prefer a darker finish.
- Dark chocolate chunks: Swap for part of the chocolate chips for larger pockets of melted chocolate.
- Flaky sea salt: Sprinkle lightly over the batter before baking for a sweet-salty contrast.
- Mini marshmallows: Fold in a small handful for a rocky-road style twist.
- Peanut butter swirl: Dot a few tablespoons over the batter and swirl gently before baking.
- Gluten-free flour blend: A measure-for-measure baking blend may work, though the texture may vary slightly.
- Natural cocoa powder: Use it if that is what you have, though Dutch-process usually gives a smoother and deeper chocolate profile.
- Bittersweet baking chocolate: A great choice if you want a slightly less sweet, more intense chocolate brownie.

Baking Science Behind This Recipe
Great brownies depend on balance. Too much flour and the batter starts moving toward cake. Too much leavening and you lose the dense, tight crumb that makes brownies so satisfying. That is why this brownies recipe skips baking powder and baking soda entirely. Without chemical leaveners, the brownies stay compact, rich, and fudgy.
Butter contributes more than flavor. It carries fat evenly through the batter, which helps create tenderness and richness. Melted chocolate adds cocoa solids and cocoa butter, giving the brownies body and a smoother mouthfeel. When you combine both butter and chocolate, you get a stronger structure than cocoa powder alone can provide.
Sugar is especially important in brownies. Beyond sweetness, it affects texture and appearance. As sugar dissolves and bakes, it helps create that characteristic shiny crackly top. Beating the eggs with the sugar gives the sugar a better chance to dissolve before the brownies go into the oven, which improves both the finish and the interior texture.
Eggs provide structure and moisture. In brownies, they are doing a lot of work because there is no chemical leavening to support the batter. When beaten with sugar until pale and thick, they also trap some air, which helps the brownies hold together without becoming airy like cake.
Cocoa powder deepens the flavor while keeping the batter from becoming overly greasy. Flour gives structure, but in a limited amount so the brownies stay dense. Salt sharpens all the chocolate notes, and the final addition of chopped chocolate and chips creates textural variation throughout the pan. Every part of the formula has a purpose, and that is exactly why this brownies recipe bakes up with such a reliable result.
How to Make It
Preheat the oven and prepare the pan.
Heat your oven to 350 degrees Fahrenheit. Line a 9-inch square metal baking pan with parchment paper, leaving overhang on two sides so you can lift the brownies out later. This matters because a lined pan prevents sticking and makes neat slicing much easier. The visual cue is a pan fully lined with parchment pressed into the corners and sitting flat against the sides.

Melt the butter with half of the chopped chocolate.
Place the butter and half of the chopped chocolate in a microwave-safe bowl or measuring cup. Heat in short intervals, stirring after each, until smooth and fully melted. This matters because gentle melting prevents the chocolate from scorching or separating. You are looking for a glossy, smooth mixture with no unmelted pieces and no oily streaks.

Beat the eggs and sugar until pale and thick.
In a large mixing bowl, beat the eggs and sugar together on medium-high speed for about 3 minutes. This matters because it helps dissolve the sugar and creates the structure needed for shiny tops and a better brownie texture. The visual cue is a mixture that has lightened in color, thickened noticeably, and falls from the beaters in a ribbon that briefly sits on the surface before blending back in.

Add the warm chocolate mixture and vanilla.
Pour the slightly cooled melted butter and chocolate into the egg mixture, then add the vanilla. Mix until everything is smooth and evenly combined. This matters because the warm chocolate mixture blends more cleanly and starts building the rich brownie base without scrambling the eggs. The visual cue is a glossy medium-brown mixture with no streaks of egg or butter.

Sift in the dry ingredients.
Sift the cocoa powder, flour, and salt directly into the bowl. Mix gently until just combined. This matters because sifting breaks up lumps, especially in cocoa powder, and prevents overmixing once the flour is added. The visual cue is a thick, dark batter with no dry pockets and no pale flour streaks remaining.

Fold in the remaining chopped chocolate and chocolate chips.
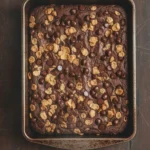
Add the rest of the chopped chocolate and the chocolate chips, then fold with a spatula until evenly distributed. This matters because these pieces melt into the brownies as they bake and create that extra fudgy, chocolate-loaded texture. The visual cue is a very thick batter with chocolate pieces evenly suspended throughout.

Spread the batter into the prepared pan.
Transfer the batter to the lined pan and smooth it into an even layer. A small offset spatula works especially well here because the batter is thick. This matters because an even layer helps the brownies bake uniformly from edge to center. The visual cue is a level surface with the batter reaching all four corners.
Bake until the center is just set.
Bake for about 28 to 30 minutes, then start checking. This matters because brownies can go from perfectly fudgy to overbaked very quickly. The visual cue is a top that looks set and shiny, with slightly firmer edges and a center that no longer looks raw.

Test with a toothpick the right way.
Insert a toothpick into the center. If it comes out with wet batter, the brownies need more time. Check every 2 minutes until the toothpick comes out with a few moist crumbs but not raw batter. This matters because a clean toothpick can mean the brownies have baked too long and may turn dry. The visual cue is moist crumbs clinging to the toothpick rather than fluid batter.
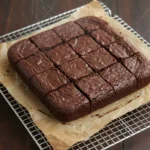
Cool completely before slicing.
Set the pan on a cooling rack and let the brownies cool fully before lifting them out and cutting them into squares. This matters because brownies continue to set as they cool, and slicing too early can make them fall apart or seem underdone. The visual cue is a pan that feels fully cool to the touch and brownies that lift out cleanly with the parchment.
Baking Tools and Equipment
- 9-inch square metal baking pan
- Parchment paper
- Microwave-safe bowl or measuring cup
- Large mixing bowl
- Hand mixer or stand mixer with whisk attachment
- Fine-mesh sieve
- Silicone spatula or wooden spoon
- Offset spatula
- Cooling rack
- Sharp knife for slicing
Each baking tool listed above was carefully selected for consistent results. Click any product name to explore trusted kitchen essentials.

How to Know It Is Done
Brownies can be tricky because they continue setting after they come out of the oven. If you wait for them to behave like cake, you will likely overbake them. The best sign is a center that looks set on top but still slightly soft underneath, paired with edges that are a bit more defined.
The toothpick test matters here, but the result should be interpreted correctly. You are not looking for a completely clean toothpick. For fudgy homemade brownies, a few moist crumbs are exactly what you want. Wet batter means they need longer, but a dry toothpick can mean the brownies have already baked too far.
You will also notice the aroma. When the kitchen starts smelling deeply chocolatey, it is a good cue to begin checking. Visually, the top should look shiny and finished, not raw or liquid in the center. Once cooled, the brownies should slice cleanly and reveal a dense, moist interior.
Common Mistakes to Avoid
- Using a glass or ceramic pan instead of a metal one, which can change how the brownies bake.
- Overmixing after adding the flour, which can make the brownies tougher.
- Skipping the egg-and-sugar beating step, which can affect the shiny top and overall texture.
- Overheating the butter and chocolate, which can cause the mixture to separate.
- Packing the flour instead of measuring it properly, which can make the brownies too thick and dry.
- Baking until the toothpick comes out clean, which usually means overbaked brownies.
- Cutting the brownies while they are still warm, which can lead to messy slices and a softer structure.
- Using low-quality chocolate, which can noticeably reduce flavor in a recipe this chocolate-forward.
- Forgetting the salt, which helps keep the brownies balanced and flavorful.
- Swapping in baking powder or baking soda, which changes the texture away from dense and fudgy.
Storage and Freezing
- Store brownies in an airtight container at room temperature for up to 1 week.
- Place parchment between layers if stacking to keep the tops from sticking.
- For a firmer texture, chill the brownies before slicing or serving.
- Freeze fully cooled brownie squares for up to 3 months.
- Wrap individual pieces tightly, then place them in a freezer-safe container or bag.
- Thaw overnight in the refrigerator or at room temperature before serving.
- For the best texture after freezing, let the brownies come fully to room temperature before eating.

Flavor Variations
- Salted dark chocolate brownies: Use bittersweet chocolate and finish with flaky sea salt.
- Walnut fudge brownies: Fold in chopped walnuts for crunch and classic brownie flavor.
- Espresso brownies: Add espresso powder to intensify the chocolate.
- Peanut butter swirl brownies: Swirl peanut butter over the top before baking.
- Cookies and cream brownies: Fold in crushed sandwich cookies for a cookies-and-cream effect.
- Double dark brownies: Use dark chocolate chips and bittersweet chocolate throughout.
- Holiday brownies: Add peppermint extract sparingly and top with crushed candy canes after baking.
- Mocha brownies: Add espresso powder and a handful of dark chocolate chunks.
- Caramel brownies: Swirl thick caramel into the batter before baking.
- Nut-free classic brownies: Leave them exactly as written and let the pure chocolate flavor shine.
Expert Tips
- Use room-temperature eggs so they whip more easily with the sugar.
- Choose a good-quality chocolate because this brownies recipe depends heavily on chocolate flavor.
- Sift the cocoa powder to avoid lumps in the batter.
- Do not rush the ribbon stage; it helps with both texture and appearance.
- Use a metal pan for more even baking and better edge-to-center consistency.
- Line the pan with parchment overhang so you can lift the brownies out cleanly.
- Start checking early rather than late, especially if your oven runs hot.
- Let the brownies cool fully before slicing for the cleanest squares.
- Wipe the knife between cuts if you want especially neat presentation.
- For even more flavor, sprinkle a tiny pinch of flaky salt on top right after baking.
Frequently Asked Questions
1. Why are my brownies not getting shiny tops?
A shiny top usually comes from properly dissolved sugar and the right mixing method. In this brownies recipe, beating the eggs and sugar until pale and thick helps create that signature surface. Warm melted butter and chocolate also help dissolve the sugar further. If the sugar is not well incorporated, the brownies can look dull or slightly grainy instead of glossy.
2. Can I make this brownies recipe with Dutch-process cocoa powder?
Yes, and it is actually an excellent choice here. Since the recipe does not rely on baking soda or baking powder for lift, Dutch-process cocoa works beautifully and gives the brownies a smoother, darker chocolate flavor. Natural cocoa powder also works, but the final flavor may be a little sharper and lighter in tone.
3. Why do these brownies need to cool completely before cutting?
Brownies continue to set as they cool, and that matters especially in a fudgy recipe like this one. If you slice them too early, the center can seem overly soft and the cuts may turn messy. Once fully cooled, the structure firms up enough to hold clean, attractive squares while still keeping the interior moist and rich.
4. Can I freeze homemade brownies?
Yes, these homemade brownies freeze very well. Let them cool fully, cut them into squares, and wrap them tightly before freezing. They keep well for up to 3 months. After thawing, they still maintain their fudgy texture and rich chocolate flavor, which makes them great for make-ahead baking.
5. How do I keep brownies fudgy instead of cakey?
A fudgy brownie comes from the right ratio of fat, chocolate, eggs, and flour. This brownies recipe uses a relatively modest amount of flour, no chemical leaveners, and plenty of chocolate, which helps maintain a dense texture. Careful baking is equally important. Pulling them out when the toothpick shows moist crumbs rather than waiting for a clean pick helps preserve that soft fudgy center.
6. What is the best pan for brownies?
A 9-inch square metal pan is the best choice for this recipe. Metal conducts heat more efficiently and evenly than glass or ceramic, which helps the brownies bake consistently. That gives you a better balance of set edges and fudgy center, which is exactly what you want in a recipe like this.
Related Recipes From Our Kitchen
- Homemade Brownie Recipe — If you love rich chocolate desserts, this homemade brownie recipe is another great option to bake when you want a classic, crowd-pleasing treat with deep cocoa flavor and a soft, satisfying center.
Final Notes
A truly great brownies recipe should give you more than just chocolate flavor. It should give you texture, structure, visual appeal, and that unmistakable homemade comfort that only a well-made pan of brownies can deliver. These seriously fudgy homemade brownies do exactly that. They are rich, dense, glossy on top, soft in the center, and dependable enough to bake again and again.
Whether you serve them plain, with a scoop of vanilla ice cream, or with a dusting of flaky salt on top, these brownies hold their own. They are a strong, classic addition to any baking collection and the kind of recipe that earns repeat requests. When you want homemade brownies that feel indulgent, look beautiful, and taste like real chocolate in every bite, this is the pan to make.

Seriously Fudgy Homemade Brownies
Ingredients
Equipment
Method
- Preheat the oven to 350 degrees Fahrenheit and line a 9-inch square metal baking pan with parchment paper, leaving overhang on two sides.
- Place the butter and half of the chopped chocolate in a microwave-safe bowl or measuring cup and heat in short intervals, stirring after each, until smooth and fully melted.
- In a large mixing bowl, beat the eggs and sugar together on medium-high speed for about 3 minutes until pale, thick, and ribbon-like.
- Pour the slightly cooled melted butter and chocolate into the egg mixture, add the vanilla, and mix until smooth and evenly combined.
- Sift the cocoa powder, flour, and salt into the bowl and mix gently until just combined.
- Fold in the remaining chopped chocolate and the chocolate chips until evenly distributed.
- Transfer the batter to the prepared pan and smooth it into an even layer.
- Bake for about 28 to 30 minutes, then begin checking for doneness.
- Insert a toothpick into the center; if it comes out with wet batter, continue baking and check every 2 minutes until it comes out with a few moist crumbs.
- Place the pan on a cooling rack and cool completely before lifting the brownies out with the parchment and slicing into squares.
Notes
- Use a 9-inch square metal pan for the most even baking and the best edge-to-center texture.
- Do not use a glass or ceramic pan if you want the same baking result described in the recipe.
- Room-temperature eggs whip more easily with the sugar and help create the shiny top.
- Beat the eggs and sugar until pale and thick; this step supports both texture and appearance.
- Melt the butter and chocolate gently to avoid scorching or separation.
- Sift the cocoa powder before mixing so the batter stays smooth and lump-free.
- Mix the dry ingredients only until combined to avoid a tougher brownie texture.
- The batter will be very thick, so an offset spatula helps spread it evenly in the pan.
- Start checking at 28 minutes because overbaking will reduce the fudgy texture.
- Brownies are done when a toothpick comes out with a few moist crumbs, not a clean toothpick.
- Cool completely before slicing so the brownies finish setting and cut into neat squares.
- Store in an airtight container at room temperature for up to 1 week.
- Place parchment between layers if stacking to prevent sticking.
- These brownies freeze well for up to 3 months when wrapped tightly.
- Let frozen brownies thaw fully and come to room temperature for the best texture.
- Calories: 285
- Carbohydrates: 36g
- Protein: 4g
- Fat: 15g
- Saturated Fat: 9g
- Sugar: 26g
- Fiber: 3g
- Sodium: 125mg
- Cholesterol: 58mg


 Recipe")
 Recipe")