


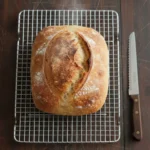


Introduction
There is something deeply satisfying about pulling a golden loaf of homemade sourdough bread from the oven. The crust crackles softly as it cools, the aroma fills the kitchen, and every slice reveals an airy, rustic crumb that feels like it came straight from a bakery. For many home bakers, learning how to bake sourdough bread for beginners feels intimidating at first, but the truth is that the process is far simpler than it seems once you understand the basics. With just flour, water, salt, and an active starter, you can transform humble pantry ingredients into one of the most rewarding breads you’ll ever make.
This easy sourdough bread recipe is designed specifically for beginners who want reliable results without complicated techniques. Instead of relying on commercial yeast, the dough rises using natural wild yeast captured in a sourdough starter, creating a loaf that develops rich flavor during slow fermentation. While sourdough baking does require patience, most of the time involved is simply letting the dough rest and ferment. The hands-on work is surprisingly simple and becomes second nature after a few bakes.

If you have ever wondered how bakeries produce those beautiful artisan loaves with crisp crusts and chewy interiors, this guide will show you exactly how it’s done in your own kitchen. By following this step-by-step beginner sourdough bread recipe, you will learn the essential techniques that build structure, flavor, and oven spring. Once you master the process, sourdough baking quickly becomes a relaxing routine that turns basic ingredients into extraordinary bread.
Why This Recipe Works
• Uses a simple no knead sourdough bread method that replaces kneading with stretch-and-fold techniques.
• Slow fermentation develops deep flavor while improving digestibility.
• Beginner-friendly hydration makes the dough easier to handle and shape.
• A Dutch oven sourdough bread method creates bakery-style crust and steam environment.
• Clear visual cues guide you through each stage of fermentation and baking.

What Makes This Recipe Special
Many guides for how to make sourdough bread at home assume you already understand baking terminology and advanced techniques. This recipe removes that confusion by focusing on the essential steps that matter most for beginners. Instead of overwhelming you with complicated hydration ratios or professional baking equipment, it shows how to create excellent bread using tools you likely already have.
Another reason this beginner sourdough bread recipe stands out is the emphasis on fermentation timing and dough observation. Sourdough baking is influenced by temperature, starter strength, and environment, so learning how the dough should look and feel is more valuable than strictly following the clock. Throughout the process, you will see visual cues that help you recognize when your dough is ready to move to the next stage.
Perhaps the most rewarding aspect of sourdough baking is how dramatically flavor improves with time. The fermentation process breaks down grains slowly, producing complex tangy notes and natural sweetness. According to fermentation research referenced by The Sourdough School, long fermentation enhances both flavor and nutrient availability in traditional sourdough bread.
Taste & Texture Results
• Deep, slightly tangy flavor from natural fermentation
• Crisp, crackly crust similar to artisan bakery loaves
• Soft, chewy crumb with open airy pockets
• Subtle wheat sweetness balanced by gentle acidity
• Perfect structure for slicing, sandwiches, or toasted bread

Ingredients
• 500 grams all-purpose flour
• 350 grams water (room temperature)
• 100 grams active sourdough starter
• 10 grams salt
If you need to convert ingredient measurements, adjust baking temperatures, or switch between US and metric units, use our complete baking measurement conversion calculator.

Optional Add-Ins & Substitutions
• Substitute bread flour for stronger gluten development and taller loaves.
• Replace 50–100 grams of flour with whole wheat flour for deeper flavor.
• Add roasted garlic or herbs for savory artisan bread variations.
• Incorporate sunflower seeds, pumpkin seeds, or sesame seeds for texture.
• Mix in dried cranberries and walnuts for a sweet rustic loaf.

Baking Science Behind This Recipe
Understanding the science behind sourdough bread fermentation helps beginners troubleshoot and improve their baking results. Unlike commercial yeast breads that rise quickly, sourdough uses wild yeast and beneficial bacteria that develop naturally within a starter culture. These microorganisms ferment sugars in the flour and release carbon dioxide, which creates the bubbles responsible for the bread’s airy crumb.
During the autolyse stage, flour absorbs water and begins forming gluten naturally without kneading. This step strengthens dough structure while improving extensibility, making the dough easier to shape later. When the dough rests during bulk fermentation, enzymes break down starches into sugars that feed the yeast, allowing the dough to rise gradually while building flavor.
Another key process occurs during long fermentation: the breakdown of phytic acid. This naturally occurring compound in grains can bind minerals and reduce absorption in the body. Extended fermentation helps break down phytic acid, increasing mineral availability and improving digestibility. This is one reason many people find traditional sourdough bread easier to digest compared to fast-rise yeast breads.
Step-by-Step Instructions
Feed the Starter: Feed your sourdough starter 4–12 hours before making dough so it becomes active and bubbly. The starter should double in size and smell pleasantly tangy, which indicates strong fermentation. If a small spoonful floats in water, it is ready to use for baking

Mix the Dough: In a large bowl combine water, active starter, flour, and salt. Stir until all flour is hydrated and the mixture forms a shaggy dough. The dough may look rough and slightly sticky at this stage, which is completely normal.

Autolyse Rest: Cover the bowl and let the dough rest for 30 minutes. This period allows the flour to absorb water fully and begin gluten formation naturally. The dough will feel smoother and more elastic after the rest.

Stretch and Fold: Grab one side of the dough, stretch it upward, and fold it toward the center. Rotate the bowl and repeat until you complete four folds. This process strengthens gluten structure without kneading.

Bulk Fermentation: Cover the dough and let it rise in a warm place until roughly doubled in size. Depending on temperature and starter strength, this may take 6–12 hours. The dough should look airy, puffy, and slightly domed.

Shape the Dough: Transfer the dough to a lightly floured surface and gently shape it into a round boule. Create surface tension by folding the edges inward and rotating the dough against the counter. This tension helps the bread rise upward in the oven.

Bake the Bread: Preheat a Dutch oven to 500°F for one hour. Place the dough onto parchment paper, score the top with a razor, and transfer it into the hot Dutch oven. Bake covered for 20 minutes, then uncovered for 20–25 minutes until deep golden brown.

Baking Tools & Equipment
• Large mixing bowl
• Digital kitchen scale
• Dough scraper
• Banneton or proofing basket
• Dutch oven
• Parchment paper
• Razor blade or bread lame
“Each baking tool listed above was carefully selected for consistent results. Click any product name to explore trusted kitchen essentials.”

How To Know When Baking Is Done
Determining when homemade sourdough bread is fully baked involves a combination of visual cues and internal temperature. The crust should appear deep golden brown with darker caramelized edges where the score opened during baking. This dramatic expansion, known as oven spring, indicates the dough had proper fermentation and structure before entering the oven.
Another reliable indicator is internal temperature. A finished loaf typically reaches 205–210°F in the center. When tapped on the bottom, the loaf should sound hollow rather than dense. Finally, the crust should feel firm and crisp rather than soft or pale, signaling that moisture has evaporated properly during baking.
Common Mistakes To Avoid
• Using an inactive starter that has not doubled after feeding.
• Cutting fermentation time too short, which prevents proper rise.
• Over-fermenting the dough until it becomes overly sticky or flat.
• Adding too much flour during shaping, which can tighten the crumb.
• Slicing bread while hot instead of letting it cool completely.Storage & Freezing Guide
• Store cooled sourdough bread at room temperature for up to 3 days.
• Keep bread in a paper bag or bread box to preserve crust texture.
• Avoid storing fresh bread in plastic bags, which soften the crust.
• Freeze sliced bread for up to 3 months in airtight bags.
• Reheat frozen slices in a toaster or oven to restore crispness.
Flavor Variations
• Roasted garlic and rosemary artisan loaf
• Jalapeño cheddar sourdough bread
• Honey oat sourdough sandwich bread
• Cranberry walnut rustic sourdough
• Olive and herb Mediterranean sourdough

Frequently Asked Questions
1. What is the easiest sourdough bread recipe for beginners?
The easiest method uses a no knead sourdough bread technique with stretch-and-fold steps instead of traditional kneading. This approach simplifies gluten development and produces excellent texture with minimal effort. Beginners often find this method much more approachable because it relies on simple resting and folding rather than intensive mixing.
2. How long does sourdough bread take to make?
A full sourdough bread baking process usually takes between 18 and 24 hours, including fermentation and proofing time. Most of this time involves resting periods where the dough develops flavor naturally. The actual hands-on work is typically less than 30 minutes.
3. What flour is best for sourdough bread?
For beginners, all-purpose flour or bread flour works extremely well because it balances strength and accessibility. Bread flour produces slightly stronger gluten structure and higher oven spring, while all-purpose flour is easier to find and still creates excellent sourdough loaves.
4. Why didn’t my sourdough bread rise properly?
Poor rise usually occurs because the starter was not active enough or the dough did not ferment long enough. Temperature also plays a role, as cooler environments slow fermentation. Ensuring your starter doubles in size before baking greatly improves success.

Expert Baker Tips
• Always bake with a fully active starter that has doubled after feeding.
• Use wet hands during stretch-and-fold steps to prevent sticking.
• Cold proofing overnight makes scoring easier and improves oven spring.
• Preheat the Dutch oven thoroughly to create strong initial steam.
• Allow bread to cool at least one hour before slicing.
Related Recipes From Our Kitchen
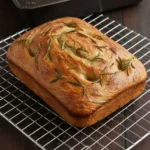
Banana Bread Recipe – Simple crusty loaf with minimal effort and big flavor.
Final Baking Notes
Learning to bake beginner sourdough bread is less about perfection and more about understanding the rhythm of fermentation. Each loaf you bake teaches you something new about dough texture, timing, and flavor development. With patience and practice, what once seemed like a complicated baking project quickly becomes a relaxing kitchen ritual.
The beauty of sourdough lies in its simplicity. Flour, water, salt, and a living starter come together through time and natural fermentation to create bread that feels deeply connected to traditional baking. Once you experience the aroma of a freshly baked loaf and the satisfying crunch of that first slice, you may never look at store-bought bread the same way again.

Sourdough Bread Recipe
Ingredients
Equipment
Method
- Feed the sourdough starter 4–12 hours before baking until it becomes active, bubbly, and doubled in size.
- In a large mixing bowl combine water, active starter, flour, and salt. Stir until all flour is hydrated and a shaggy dough forms.
- Cover the bowl and allow the dough to rest for 30 minutes to hydrate the flour and begin gluten development.
- Perform the stretch-and-fold method by pulling one edge of the dough upward and folding it toward the center. Rotate the bowl and repeat until four folds are completed.
- Cover the dough and allow it to bulk ferment in a warm place until it roughly doubles in size, about 6–12 hours.
- Transfer the dough to a lightly floured surface and shape it into a round boule, creating surface tension by folding edges inward and rotating the dough.
- Place the shaped dough into a banneton or proofing basket and refrigerate for an overnight proof of about 12–15 hours.
- Preheat a Dutch oven to 500°F for 1 hour.
- Remove the dough from the refrigerator, place it on parchment paper, and score the top with a razor blade.
- Transfer the dough with parchment into the hot Dutch oven. Bake covered for 20 minutes.
- Remove the lid and continue baking uncovered for 20–25 minutes until the crust becomes deep golden brown.
- Remove the bread from the oven and allow it to cool for at least 1 hour before slicing.
Notes
- Ensure the sourdough starter is fully active and bubbly before mixing the dough to achieve proper fermentation.
- If the dough feels sticky during stretch-and-fold steps, lightly wet your hands instead of adding extra flour.
- Bulk fermentation time may vary depending on the temperature of your kitchen and the strength of your starter.
- The dough should look airy and slightly domed when bulk fermentation is complete.
- Cold proofing overnight improves flavor and makes the dough easier to score before baking.
- A thoroughly preheated Dutch oven helps create steam and produces a crisp bakery-style crust.
- Always allow sourdough bread to cool completely before slicing to prevent a gummy interior.
- Bread flour can be substituted for stronger gluten development and a taller loaf.
- If storing at room temperature, keep bread in a paper bag or bread box to maintain crust texture.
- Slice and freeze leftover bread in airtight bags for convenient long-term storage and quick reheating.


